Friday, 8 June 2012

Racing dessert table


This is possibly the most challenging one I've done, as I'm not really passionate about cars but I'm surrounded by boys who are - and we all know that car enthusiasts are the hardest to please as the replica car has to be just perfect!  I've also shown the 'real' car the table was themed around above.


I attempted a car cake which, after a lot of hard work eventually passed scrutiny - it did actually look like the proper car this year, I was told - last year's effort was more like a Fiat Punto, according to the expert.

My bonbon jars were again put to good use - filled with sweets and popcorn.  I made the 'podium' to display the bonbon jars on from stacks of cake drums covered in silver vinyl and  trimmed with chequered ribbon.


Other craft items included chequered boxes which I filled with crisps but would be suitable for popcorn as well; I can't provide the template as a download due to the type of file required to cut the boxes out but I will make them to order once I figure out how to add a 'buy it now' button to the site.

The cupcake wrappers were also machine cut - printed with a cartoon design of Robert's car (lots of fun with Photoshop) and a chequered flag design.

I changed the drinks bottle labels to match the theme - the boys had lots of fun drinking 'gear oil', 'engine oil', 'antifreeze', 'brake fluid' and 'octane boost' though it all had the distinct flavour of cola.

My edible image printer was also put to good use printing images of the car to put on cookies and alloy wheel centres for the brownies - I baked my usual brownie mix in cupcake cases but only filled the cases less than half full.  When cooked and cooled I carefully peeled the cases away and was left with a round 'wheel'.  As brownies can naturally sink in the middle due to the dense, fudgy texture it left the perfect indent to apply the wheel centre to.

My favourite part was making the chocolate truffle racing cars.  Ben (6) and I made a great team - he sorted out and matched the different coloured Smarties for me to stick on to the truffle cars though there were quite a few Smarties that disappeared in the process - I can't think where to;-)

Chocolate Truffle Racing Cars
You will need:
500 g milk chocolate, plus a little extra to stick the Smarties on
1 x 397 g tin sweetened condensed milk
50 g butter
a few packs of Smarties and Smartie eggs

Melt the chocolate, condensed milk and butter together, stir well until combined then pour the mixture into a lined tin, cover with cling film and leave overnight to set.

The next day divide the mixture into pieces approx 30 g in weight and shape each into a sausage, tapered at both ends.  Melt a little bit of chocolate and place in a small greaseproof piping bag and snip off the end. There's no need to use a nozzle.

Sort out 5 Smarties and 1 Smartie egg the same colour for each car.  4 of the Smarties are for the wheels, the remaining one represents the steering wheel/dash - you need to cut in half with a sharp knife and place it towards the front of the car, in front of the Smartie egg (driver's helmet).  Stick all on with the melted chocolate and leave to set.

With all those Smarties lying around Robert requested Smartie cookies as well, so I modified my chewy oat and raisin cookie recipe to make them.  Went down a treat!

Chewy Smartie Cookies
You will need:

9 oz/250 g butter
9 oz/250 g light soft brown sugar
½ teaspoon vanilla extract
6 oz/170 g condensed milk
13 oz/370 g self raising flour
½ teaspoon baking soda
½ teaspoon cream of tartar
7 oz/200 g multicoloured Smarties

Cream butter, sugar and vanilla together until light and creamy.  Stir in condensed milk, flour, baking soda and cream of tartar to make a soft dough.  Gently knead in Smarties, reserving a few for decoration at the end.  Roll the mixture into small balls and place, well apart on a lined baking tray – the cookies will spread during cooking.  Press the remaining Smarties into the cookie balls.

Place in an oven preheated at 150C (fan) for 10 – 12 minutes.  The secret to chewy cookies is not to overcook them – they won’t look ready and will still be sticky and wobbly but once they have spread and are just starting to colour on top they are ready - remove from the oven.  Cool on the tray – do not attempt to lift whilst still warm.

If you've made a racing theme table or are going to attempt one I'd love to see your creations so please feel free to share!


Monday, 26 March 2012

Girly Dessert Table


I have only one daughter (and four sons) so my opportunities for girly celebrations are rather limited.

Taking inspiration from the bunting design I created, I had the idea of using patterns - stripes and polka dots and since her birthday is in the spring I thought cherry blossom would be pretty and seasonal.

The centrepiece is a two-tier cake with polka dot round top tier and striped square bottom tier.  The sugar cherry blossoms carry the design down both tiers.

Other items (left to right) are strawberry and 'blue' bonbons in my gorgeous (but expensive) bonbon jars, raspberry fluff in shot glasses, chocolate truffle pops with sugar flowers, flower jammy cookies, marshmallow snowballs, vanilla cupcakes in polka dot cases with sugar blossoms and malteser and marshmallow mini cheesecakes.

If you'd like to recreate this look here are some recipes and tips you may find useful:

Bunting
You'll need:
bunting template - click here to download pdf
A4 paper or card
drinking straws (if using paper)
narrow ribbon in a coordinating colour - length depends on the number of letters in the name
sellotape

To make the bunting, print out the letters you require onto the A4 sheets.  Fold along the lower edges, trim at the back then stick securely. 

Make a fold approx 2 cm from the top of the bunting and trim the edges so that they do not show from the front.  If you are using paper cut a length of drinking straw to fit inside the fold and stick down then fold the paper over and secure.  You can then thread the ribbon through the straw.

If you have used card for your bunting you can secure the ribbon directly without using a straw - just check that the letters are the correct way round!

Raspberry Fluff

You'll need:
1 x Hartleys raspberry jelly (strawberry works too but the finished colour won't be so vibrant)
1 large (410 g) tin evaporated milk - not the semi-skimmed sort, full fat works best

Dissolve the jelly in the minimum amount of water (around 100 ml) - this is easiest to do in the microwave, put the jelly cubes and cold water in a jug and microwave on full power for 30 seconds, stir well until the jelly cubes have all dissolved, you may need to return it to the microwave for a further few seconds.  Ideally you don't want the jelly to be too warm when it is dissolved as you need to set it aside to cool to room temperature before adding the evaporated milk.  It will thicken slightly, but do not allow to set otherwise it won't work.

When the jelly is at room temp, put it into a large mixing bowl and add the evaporated milk.  Whisk at full speed until the mixture becomes mousse-like, light and airy (I do this in the Kenwood mixer).  Pour into serving glasses and place in the fridge to set.

You can decorate the finished glasses with fresh fruit or miniature chocolate swirls as above.

Jammy Flowers
You'll need:
9 oz/250 g butter
6 oz/170 g caster sugar
1 lb/ 450 g plain flour
small amount of strawberry jam
flower cookie cutter
small circle cutter - I used a piping nozzle

Cream butter and sugar together until light and fluffy then fold in flour and knead until the mixture binds together.  Roll out and cut out flower shapes, half with cut out circles in the middle the other half plain.  Bake at 140C for 25 - 30 minutes, until the biscuits are firm to the touch.  Remove from the oven and allow to cool.

When cool, spread the biscuit with no centre hole with the strawberry jam and sandwich one with a hole on top.

Marshmallow Snowballs

You'll need:
24 digestive biscuits
7 oz/200 g chocolate
4 oz/115 g butter
1 x 397 g tin condensed milk
2 – 3 packets pink and white marshmallows
fine coconut, for rolling
a little petal dust colouring, optional to colour coconut if desired

Crush the digestive biscuits finely.  Melt the chocolate and butter together then add the condensed milk and mix well.  Stir in the crushed biscuits.
Using the fingertips, cover each marshmallow with a little of the mixture.  Roll into a ball and toss in fine coconut (if you want to colour the coconut then do this before rolling).  Leave aside to firm.

Malteser and Marshmallow Mini Cheesecakes
Base:
3 oz butter
6 oz digestives

Melt the butter, crush the digestives finely then mix together. Press firmly into 12 mini round loose-bottomed tins, or 1 x 8" round tin.

Filling:
200 g pack soft cheese
55 g/2 oz caster sugar
250 ml carton double cream
100 g maltesers - reserve about 6 for topping, roughly crush the rest
50 g mini marshmallows - cut in half for the mini cheesecakes - I picked out the pink ones only, keeping back a few for decoration

Beat the soft cheese and caster sugar together briefly to soften then beat in the double cream until stiff. Fold in the maltesers and marshmallows then spoon over the base in the prepared tin and level.

Decorate with a marshmallow and the remaining maltesers - finely crushed. 


Name Cards
click here to download template then just print, cut out and fold in half.


Monday, 5 March 2012

Science Magic Theme Dessert Table

My youngest son's birthday party - we booked the Party Professor to entertain the children whilst I provided the food.  As most of the experiments had a science or rocket theme this gave me some ideas for the table.

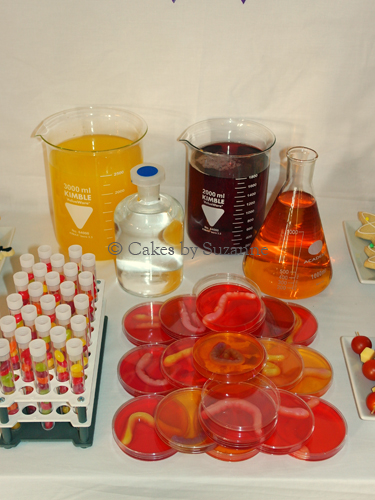
Ben's cake had a rocket on the top (edible of course) with a science equipment side design - laboratory beakers, flasks and pipettes.  I managed to source some real laboratory equipment - beakers, a conical flask and stopper bottle to hold the drinks and some plastic test tubes which were filled with mini jelly beans.  My absolute favourite thing was the worms in jelly - my eldest son borrowed (brand new) petrie dishes from school, into which went a jelly worm and some jelly.  'Disgustingly brilliant' - or so I was told!  There were various types of cookies, chocolate brownies, mallow krispies, rocky road mini cupcakes and lots of fruit and vegetable kebabs.


Monday, 20 February 2012

Sleepover Dessert Table


This dessert table was created for my 11 year old son - he wanted his friends to stay for a sleepover at his birthday.

His cake depicted him on his bed and each child had a mini cake with a model of them to take home - I did try to match hair colours and styles to the boys and they had good fun choosing which one was them.

The personalised bunting and popcorn boxes were hand made, using a pattern that was carried throughout the table design.

Other items included multicoloured jellies - orange, lemon and lime; chocolate crunch slices, krispie pops, choc orange shots and some multicoloured sweets.